Amazon.ca Widgets

How to solve Diffie-Hellman warning on Qualys SSLLabs Test

In a previous article, I talked about how you can get a better note on Qualys SSLLabs test, by configuring CAA DNS entry.

Today, we’ll talk about another warning most of us must resolve to get the “A” Rating.

On our AWS EC2 Windows 2012 R2 server, by default, we got that security issue from SSLLabs:

This server supports weak Diffie-Hellman (DH) key exchange parameters. Grade capped to B.

Solution

That is caused by the Diffie-Hellman protocol accepted at 1024 bits.  The fix proposed by Microsoft (article) is to still accept that protocole, but only at 2048+ bits.

You need to create 1 new registry entry.  Create an empty file called df.reg, and paste that content to it:

Windows Registry Editor Version 5.00

[HKEY_LOCAL_MACHINE\SYSTEM\CurrentControlSet\Control\SecurityProviders\SCHANNEL\KeyExchangeAlgorithms\Diffie-Hellman]
"ServerMinKeyBitLength"=dword:00000800

Then, double-click on it to apply these settings, an reboot.

Run your SSL test again, that warning disappeared.

How to fix DNS CAA issue on SSL Labs Test

You ran the SSL Labs Analyzer on your domain name, and you got a DNS CAA Issue.  You want to solve it, because your goal is to get the A+ Rating from Qualys.

How to fix that?

You need to add a CAA Entry in your DNS.

What is a CAA DNS entry?

That entry tells which certificate authority delivered your SSL certificate.  If someone hack your ssl certificates with certs not in your liste of “known” providers, it will be an indication that your site may have been modified by someone else.

The blog you currently read is hosted on AWS EC2 infrastructure.  The DNS is sold and managed by AWS Route 53 services, and we got our SSL certificates free from Letsencrypt.

So, I’ll explain you how enable your CAA DNS setting based on these prerequisites.  The procedure is the same for any other SSL seller and DNS service.

Step-by-step configuration

  • In your Route 53 console:
    • select your domain name
    • Click “Create Record Set”
      • Leave name empty
      • Choose type: CAA
      • Enter value, in my case it was:
        [0 issue “letsencrypt.org”] (without brackets)

In addition, you can use that generator: https://sslmate.com/caa/ to obtain your value.
From that generator, just enter your domain name.
Next, click “Auto Generate Policy”.
The tool will look at your current SSL certificate.  Then, it will give you the desired value you should type in your CAA DNS entry.

Finally, wait a little for DNS propagation, and run the test again, and you will get a nice green status on your CAA test!

You can also test your CAA with that tool:
https://caatest.co.uk/

letsencrypt simple all sites

After using letsencrypt-win-simple (now win-acme) for my iis sites, I had some troubles, and I provide you the solutions I applied to fix them.

First, I had a lot of sites / domain names to register, and it was long to do that from the interactive app.  So I tried to do that from command prompt.  The documentation is not clear on how to do that, so I did several try-mistake.

And, finally, that’s what I found:

the first time you will add the “plugin” mode, you will get that error:
unable to find validation plugin
Because the “recommended” validation method from the ui is not the same in the command prompt, and you need to provide it, using the argument:
–validation selfhosting

These are 3 command line methods I tried.
The first allow you to get 1 single certificate for all your sites.  But, warning, if you request certificates info for any domain name registered, you will always see the first one registered.  So, I did not use that method.  But, you can try it.

letsencrypt.exe --plugin iissites --validation selfhosting --siteid 1,2,3,4,...

Warning, do not include sites id that are invalid or inexisting.

The second method allow you to create 1 certificate per site ID (that is not a domain name, you can have multiples domain name binding on 1 single site).

letsencrypt.exe --plugin iissite --validation selfhosting --siteid 1

And now, my preferred one, that I put on a batch file with all my existing sites:

letsencrypt.exe --plugin iisbinding --validation selfhosting --manualhost yoursite1.com
letsencrypt.exe --plugin iisbinding --validation selfhosting --manualhost www.yoursite1.com 
letsencrypt.exe --plugin iisbinding --validation selfhosting --manualhost yoursite2.com
letsencrypt.exe --plugin iisbinding --validation selfhosting --manualhost www.yoursite2.com 
...

You execute that only once.

After, you can run the renewal process once per month, or every day as you wish, but the renewal process will only renew certificates that were generated more than 55 days ago.

letsencrypt.exe --renew

If you experience some issues when updating, with locked certificates files, I suggest to run “iisreset” before renewing, as it always helps me to clear all these renewal errors.

Troubleshooting EC2 T2 performance issues

EC2 T2 instances are based on CPU Credit system.

If your T2 instance becomes extremely slow, there are good chances that you run out of CPU Credits.  You can look at the table here about it.

How it works

Let’s take an T2.Micro for instance.  If your cpu stay below 10%, you gain 6 cpu credits every hour, for a maximum of 144 credits.  That means, you’re full of cpu credits after 24 hours.
Each credit gives you the right to run  your cpu at 100% for 1 minute.  That means, once per 24 hours, you can use your cpu at 100% for 144 minutes (1 credit = 1 vcpu (core) running at 100% for 1 hour), that 2 and a half your.

If your cpu runs at 50%, your credits are lowering at half speed.

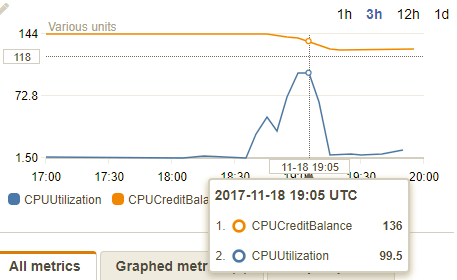
Look at this graph.  I ran a cpu-intensive process for 15 minutes, and you can see in the CloudWatch console, that when the cpu is at top, credits balance are gling down slowly.

What you can do

1. First, configure CloudWatch Alerts to get action before it happen

  • Create these 2 alarms
    • Know when your cpu is running high, before you lose all your cpu credits
    • Know when you’re running our of cpu credits.

To do that, follow the instructions on that article How to create CloudWatch alerts

2. If you don’t have credits left and needs to bring back your performance

Turn off + on your ec2 instance (not reboot, completely turn off and restart it from EC2 console).  For a T2.Micro, when an instance starts you get 30 credits immediately.

If you need more power, you can turn off your machine, edit its instance type, e.g. choose a t2.medium or large instead of a t2.micro, turn it on, let your huge procedure complete, then turn it off again and get back to t2.micro.

From your EC2 Console, select your instance, and in the menu “Action” / “instance Settings” / “Chance Instance Types”


Note that this option is disabled if the instance is running, so shutdown your instance first.

How to create CloudWatch alerts

You may want to be warned when your account balance is over a certain amount.
Or, you want to know if one of your EC2 instance uses too much cpu.
Or, when using T2 instance, you don’t want to run out of CPU Credits.

And, for many other reasons, you need to create AWS Cloudwatch Alerts.

I’ll show you how to create 2 alerts to track your cpu usage and cpu credits on your EC2 T2 instances.

First, open the Cloudwatch console.

  • Select the “Alarm” section on the left.
  • Click “Create Alarm” button.
  • On the “search Metrics” box, type “CPU”
    • You will see all your instances, with corresponding metric you can watch, related to cpu.
  • On the desired instance, check CPUUtilization, then click Next.

  • On the “Define Alarm” section, choose a limit, e.g.
    • Whenever CPUUtilization
      is >= 25
      for 2 periods

      • Periods lengths are defined on the right side, 2 periods of 5 minutes represents 10 minutes.
    • So, if the average cpu is over 25, for 2 consecutive blocs of 5 minutes, the alarm will raise.
  • Next, add 2 notifications.
    • You want an email when this alarm is entering its “alarm” state.
    • But, you also want a notification when everything is back to normal.  So, hit “+Notification” Button, and add another alarm, but choose “State is OK”.

Finally, do the same again, for “CPUCreditBalance” instead of “CPUUtilization”.
And, configure to get alarm when your Credit is below a fixed limit.
Something between 50 and 100 can be OK for a T2.Micro instance, but you can choose another limit based on the Alarm Preview graph.

How to track your server-server call in Fiddler

Telerik Fiddler is the web developer’s best friend.

It does a wonderful job of telling you why it worked, or not.  Its ability to edit and replay some requests is wonderful.  That, with Advanced REST Client, both help you accomplish your day to day job.

It tracks everything.
Almost.
Sometimes, you need to track server-to-server requests.  Example, if your app calls your back-end api, and then, your server needs to call Mandrill API to send an email to your customer.

By default, Fiddler is not tracking that request, that goes out from your server-side app. But, there’s a solution.

In fact, Fiddler track all web traffic generated by “you”, the user currently logged, and who started the fiddler app.

Now, knowing that, all you need to do, is make your IIS Pool run at your name.

By default, IIS uses “ApplicationPoolIdentity” user, it’s a kind of virtual user generated by the web engine, to run the app.  Each pool have its own username.

But, you can change it to something else.

Open IIS.  Go to the Application Pools section. Choose your app pool, then open Advanced Settings / Identity.  Click the dots, choose Custom account, enter your credentials, and you’re done!

Now, your outgoing server-side calls from your back-end can be tracked in Fiddler!

Getting Started with Amazon Web Services (AWS)

You have heard about Cloud Computing.  You looked at Amazon AWS, Microsoft Azure, Google Cloud Services, and maybe others.  But, where to start?

If you choosed AWS, as I did, I’ll try to make it easier for you to start your experience. Because, their documentation can be difficult to understand.  In fact, most of their services are easy to use, but sometimes, they use words or services names that are not related to our own vocabulary.

You know firewall.  That’s clear to your mind what it means.  But, they call it a Security Group.

AWS contains lots of services, that allows you to run a virtual machine (linux / windows), Database, API, nosql, data storage, queue, mail, etc … You looked at the service list, but there is tons of them, and it’s unclear which one is what you need.

And, sometimes, multiple services can do almost the same job.  Data Storage, for instance, is available from these 3 services: S3, EBS and EFS.

Let’s try to define some of the most popular services.

  • EC2 (Elastic Cloud Computing)
    • These are virtual machines, like you may have used with products like vmware, virtualbox, running Windows or Linux.
  • EBS (Elastic Block Store)
    • These are your Disk Drive Storage from EC2 service.  When linked to a Windows EC2 instance, it can be formatted, and mapped to a drive letter.  Your “C:\” drive, is a ntfs partition an EBS entity.  So an EBS is a virtual disk drive.  They are all based on SSD technology, but for a lower cost, you can still get magnetic drives.
  • Route 53
    • This is where all your domain name are managed.
    • You can buy a domain name, (Domain Name Registration), and you can also manage your DNS.  The DNS you manage can have been bought from AWS, or somewhere else like GoDaddy.
      • You just need to configure your NameServer to use Route53 as your primary DNS service.
  • S3 (Simple Storage Service)
    • This allow to stock “blobs” of information, usually files.  You can then access them from API, or url.  You upload these files using API, or you can use helper aplications like TNTDrive.
    • You can also store a web site on this service, if your site contains static files.  You can map an “end point” (url) to one of your S3 container (bucket).
    • Also, it’s the least expensive of the 3 storage services available, but it’s not meant to be used like EBS or EFS.  You can’t directly “mount” a drive letter from Windows to S3, without a third party app.
  • Cloudfront
    • It a “proxy”, used to serve your web site files all over the world.  See it as a CDN (Content Delivery Network).  They keep a copy of your files all over the world, and serve them to your visitors on the nearest available proxy.  Usually, you put your static files to a S3 bucket, and use cloudfront to serve them.  I don’t recommend to use that service immediatly, you should start serving your files directly from S3 instead.
    • It can be compared to other services like Cloudflare or Akamai.
  • RDS (Relational Database Service)
    • They are like EC2 virtual machine, but you can’t login directly on them. They are already configured with a database of your choice, and amazon take care of updating these machines.  You manage your databases with the tool you used normally, like SQL Server Management Studio, MySQL Workbench, etc.
    • If you’re a MySQL fan, take a look at Aurora.  It’s a RDS service built by Amazon, compatible with MySQL, but it can be up to 5 times faster.
  • EFS (Elastic File System)
    • It works like a “NAS”.  If you need a disk drive shared between multiple instances of EC2, that’s the service to use.  It is accessible as a “network drive” in Windows.  The price is based on amount of data stored on it, unlike EBS, that is charged on the maximum capacity of the drive.
  • Cloudwatch is used to diagnose all your AWS services
    • Scan your current and past CPU and Memory usage
    • Receive an alert if your monthly usage is over a defined amount
    • Detect if you lose all your “cpu credit” and get alert of it
    • etc


How to setup Free SSL / HTTPS in EC2 IIS

More and more, all sites are running over HTTPS / SSL.  I personnally think that, in the near future, port 80 / http will die, and all pages will be served in SSL.

One reason for that, is the work done by the “Let’s Encrypt” team.
Look at their sponsors, it’s all the major names of the industry.  And, beginning January 2018, they will also offer free “wildcard” certificates!

So, i’ll explain you how to configure that ssl certificate on your Windows EC2 server running IIS.

The LetEncrypt protocole can be a little difficult to setup.  But, one person did a tool that make ssl certification very easy.

That tool is called “letsencrypt-win-simple“, (now win-acme)hosted on github.

First, you need to configure your site in IIS in standard http.  (look at others chapters to configure IIS and get a fixed IP).

Then, download letsencrypt-win-simple, open a command prompt in administrator mode.  Start the executable, and it will list all your sites in IIS.  Choose the site you want to secure.  The tool will create a file in your site root folder, some communications will be done between your server and the letsencrypt api.  Your site needs to be reachable from its public IP and domain name.

Then, that’s all, the certificate is added to IIS, and the binding is also linked to your site.

These free certificates are valid for 2 months, but the letsencrypt-win-simple app auto-add itself to your “windows task manager”, and it’s running every day to automatically renew all your expired certificates.  So, you don’t need to re-run that procedure, everything is automated and works very fine.

I suggest run that on an empty site (with a simple empty default.aspx / index.htm page), before installing WordPress, because you want to configure your wordpress in https.  It can be hard to move from http to https in wordpress after the initial setup, if you have some content that includes your absolute url with “http://” hard-coded url.

DIY Guides for AWS

These how-to guides that will help you start an create a simple and cheap server solution that will cost around $20/month. These guides includes:

  • Introduction
  • Domain Name
    • Purchase
    • Configuration (DNS)
    • Transfer from GoDaddy
  • Create and configurure your personal virtual server
    • Remote desktop access
  • Hosting web sites / apps on a virtual machine (Windows Server / IIS)
  • Configure your first small business or personal web site
    • WordPress
      • PHP
      • MySQL
  • Host ASP.NET Web Application
    • IIS
    • SQL Server
  • Send-Receive Emails
    • Outgoing (local smtp / IIS), using:
      • Integrated Windows SMTP Relay Service IIS
      • or hmailserver (preferred)
        • Configuring DKIM for hmailserver
      • or AWS SES (Simple Email Service)
    • Outgoing alternative
    • Incoming (MX, txt, spf, pop, accounts, catch-all, …)
  • SVN Server
  • FTP Server
  • Network and Security
    • Firewall
    • private and public IP
  • Monitoring
  • Troubleshooting
  • etc

You can get all that running, for about $20/month, on a EC2 T2.Micro Virtual Machine.

Let’s begin with…

Getting Started with Amazon AWS.