How to fix DNS CAA issue on SSL Labs Test

You ran the SSL Labs Analyzer on your domain name, and you got a DNS CAA Issue.  You want to solve it, because your goal is to get the A+ Rating from Qualys.

How to fix that?

You need to add a CAA Entry in your DNS.

What is a CAA DNS entry?

That entry tells which certificate authority delivered your SSL certificate.  If someone hack your ssl certificates with certs not in your liste of “known” providers, it will be an indication that your site may have been modified by someone else.

The blog you currently read is hosted on AWS EC2 infrastructure.  The DNS is sold and managed by AWS Route 53 services, and we got our SSL certificates free from Letsencrypt.

So, I’ll explain you how enable your CAA DNS setting based on these prerequisites.  The procedure is the same for any other SSL seller and DNS service.

Step-by-step configuration

  • In your Route 53 console:
    • select your domain name
    • Click “Create Record Set”
      • Leave name empty
      • Choose type: CAA
      • Enter value, in my case it was:
        [0 issue “letsencrypt.org”] (without brackets)

In addition, you can use that generator: https://sslmate.com/caa/ to obtain your value.
From that generator, just enter your domain name.
Next, click “Auto Generate Policy”.
The tool will look at your current SSL certificate.  Then, it will give you the desired value you should type in your CAA DNS entry.

Finally, wait a little for DNS propagation, and run the test again, and you will get a nice green status on your CAA test!

You can also test your CAA with that tool:
https://caatest.co.uk/

Make your api faster with ThreadPool in ASP.NET

One easy way to make a server-side call faster, in your API, is to add some async procedures.  Sometimes, you want to call an external api (e.g. mailchimp…) or just send an e-mail, write a log, etc.

When your API client don’t need interaction from these calls, you can process them asynchronously.

The easiest way to add an async call is from the System.Threading.ThreadPool workspace.

As they say on their documentation, “The thread pool enables you to use threads more efficiently by providing your application with a pool of worker threads that are managed by the system.

And, it’s very easy to use.  This is a very simple example, in VB.NET:

Threading.ThreadPool.QueueUserWorkItem(
   sub
      ' Enter your async procedure here, 
      ' with callback and error handling if needed
   end sub)

That’s all!
That anonymous sub can access your caller parameters and other variables declared outside.

Stingray Windows Desktop App

You like stingray music. But when you work on your PC, you want to listen to it from a real Windows Desktop App, independent from your browser, instead of using your phone.

Actually, that product doesn’t exists.  But, they offer a Web Player, available at
https://webplayer.stingray.com

If you’re using Google Chrome, you can use “pin tab”, to make it locked on the left side of your tabs, in a mini-size tab.  But, if you close chrome, the music stops playing.

Fortunately, there’s a workaround that will almost do what you want.

You can use a quite unknown feature from chrome, to convert any web site to a look-alike windows application, that run outside of the regular browser context.

These are the steps to achieve that.

First, open your regular chrome browser, and open the Stingray web player URL.

Then, click Options (3 dots) / More Tools / Add To Desktop.

Next, you can type any name you want for the app, then click Add.

You can now see that new icon in your desktop, that looks like a standard application.  Double-click on it to launch it.

As you can see, the web site is opening inside a non-browser-like window.  You only see the title of the page, and there’s no browser address bar, or navigation buttons.  Only the web app is visible.

Also, on your Windows Taskbar, you can see the Stingray app besides the Chrome app.  Even if it’s the chrome.exe engine that run that app, it’s independent from the browser.
So, you can open only stingray, or only the browser, or both.  And you can now close or restart your browser without losing your currently playing music!

One final step, right click the stingray icon on the taskbar, and choose “Pin to taskbar”, to make it easier to start or navigate to directly.

That’s all! Have a nice listening to Stingray Music with your new Desktop App.

letsencrypt simple all sites

After using letsencrypt-win-simple (now win-acme) for my iis sites, I had some troubles, and I provide you the solutions I applied to fix them.

First, I had a lot of sites / domain names to register, and it was long to do that from the interactive app.  So I tried to do that from command prompt.  The documentation is not clear on how to do that, so I did several try-mistake.

And, finally, that’s what I found:

the first time you will add the “plugin” mode, you will get that error:
unable to find validation plugin
Because the “recommended” validation method from the ui is not the same in the command prompt, and you need to provide it, using the argument:
–validation selfhosting

These are 3 command line methods I tried.
The first allow you to get 1 single certificate for all your sites.  But, warning, if you request certificates info for any domain name registered, you will always see the first one registered.  So, I did not use that method.  But, you can try it.

letsencrypt.exe --plugin iissites --validation selfhosting --siteid 1,2,3,4,...

Warning, do not include sites id that are invalid or inexisting.

The second method allow you to create 1 certificate per site ID (that is not a domain name, you can have multiples domain name binding on 1 single site).

letsencrypt.exe --plugin iissite --validation selfhosting --siteid 1

And now, my preferred one, that I put on a batch file with all my existing sites:

letsencrypt.exe --plugin iisbinding --validation selfhosting --manualhost yoursite1.com
letsencrypt.exe --plugin iisbinding --validation selfhosting --manualhost www.yoursite1.com 
letsencrypt.exe --plugin iisbinding --validation selfhosting --manualhost yoursite2.com
letsencrypt.exe --plugin iisbinding --validation selfhosting --manualhost www.yoursite2.com 
...

You execute that only once.

After, you can run the renewal process once per month, or every day as you wish, but the renewal process will only renew certificates that were generated more than 55 days ago.

letsencrypt.exe --renew

If you experience some issues when updating, with locked certificates files, I suggest to run “iisreset” before renewing, as it always helps me to clear all these renewal errors.

How to know if a javascript object contains a property

You want to know if your javascript object contains a certain attribute. But, you tried some methods, and, because of the “undefined” value, it’s hard to differ from an undefined value, from an undefined “property”.

Let’s look at that simple example:

var obj = {
	key1: "value1",
	key2: "value2",
	key3: undefined
};

You want to know if obj contains “key4” property.
First, you try with “typeof”. But, for key3 and key 4, you get the same result:

typeof obj.key3
	"undefined"
typeof obj.key4
	"undefined"

So, what about property value?

obj.key3
	undefined
obj.key4
	undefined

The method I use is hidden in the very underused “Object” object.

Object.keys(xxx) returns an array of all properties of your object, as string.
So, you can do an indexOf that property name to know if it is contained in its definition.

Object.keys(obj).indexOf("key3")
	2
Object.keys(obj).indexOf("key4")
	-1

So, if you want to know if your property “exists” in your object:

function isDefined(obj, prop){
	return Object.keys(obj).indexOf(prop) > -1;
}

Another better alternative is to use the native hasOwnProperty inherited from Object.

The previous sample can also be:

obj.hasOwnProperty("key3") -> true
obj.hasOwnProperty("key4") -> false

How to fix account link between Playstation and Spotify

Today, I bought a Playstation 4, with that incredible Black Friday deal, at $250.  It’s about time I move from ps3 to ps4!

Now, I just want to listen to music on my ps4 system using Spotify, like I did on my ps3.  But, every time I try to connect, I get an error message about an “already linked” account.

What you need to do, is to “unlink” your playstation network and spotify account, and retry to link them after in your ps3.

First, unlink from playstation network using that link:
https://link.playstationmusic.com/spotify/details

Then, do that again, but this time, in your spotify account.
https://www.spotify.com/us/account/apps/

Now, retry to open the spotify app in your ps4, follow the link instructions, and it will work as expected!

Troubleshooting EC2 T2 performance issues

EC2 T2 instances are based on CPU Credit system.

If your T2 instance becomes extremely slow, there are good chances that you run out of CPU Credits.  You can look at the table here about it.

How it works

Let’s take an T2.Micro for instance.  If your cpu stay below 10%, you gain 6 cpu credits every hour, for a maximum of 144 credits.  That means, you’re full of cpu credits after 24 hours.
Each credit gives you the right to run  your cpu at 100% for 1 minute.  That means, once per 24 hours, you can use your cpu at 100% for 144 minutes (1 credit = 1 vcpu (core) running at 100% for 1 hour), that 2 and a half your.

If your cpu runs at 50%, your credits are lowering at half speed.

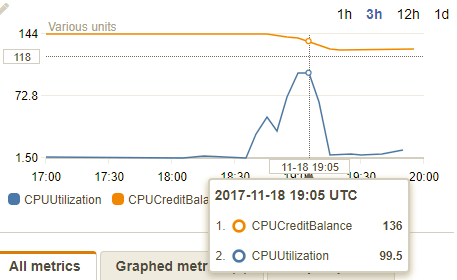
Look at this graph.  I ran a cpu-intensive process for 15 minutes, and you can see in the CloudWatch console, that when the cpu is at top, credits balance are gling down slowly.

What you can do

1. First, configure CloudWatch Alerts to get action before it happen

  • Create these 2 alarms
    • Know when your cpu is running high, before you lose all your cpu credits
    • Know when you’re running our of cpu credits.

To do that, follow the instructions on that article How to create CloudWatch alerts

2. If you don’t have credits left and needs to bring back your performance

Turn off + on your ec2 instance (not reboot, completely turn off and restart it from EC2 console).  For a T2.Micro, when an instance starts you get 30 credits immediately.

If you need more power, you can turn off your machine, edit its instance type, e.g. choose a t2.medium or large instead of a t2.micro, turn it on, let your huge procedure complete, then turn it off again and get back to t2.micro.

From your EC2 Console, select your instance, and in the menu “Action” / “instance Settings” / “Chance Instance Types”


Note that this option is disabled if the instance is running, so shutdown your instance first.

How to create CloudWatch alerts

You may want to be warned when your account balance is over a certain amount.
Or, you want to know if one of your EC2 instance uses too much cpu.
Or, when using T2 instance, you don’t want to run out of CPU Credits.

And, for many other reasons, you need to create AWS Cloudwatch Alerts.

I’ll show you how to create 2 alerts to track your cpu usage and cpu credits on your EC2 T2 instances.

First, open the Cloudwatch console.

  • Select the “Alarm” section on the left.
  • Click “Create Alarm” button.
  • On the “search Metrics” box, type “CPU”
    • You will see all your instances, with corresponding metric you can watch, related to cpu.
  • On the desired instance, check CPUUtilization, then click Next.

  • On the “Define Alarm” section, choose a limit, e.g.
    • Whenever CPUUtilization
      is >= 25
      for 2 periods

      • Periods lengths are defined on the right side, 2 periods of 5 minutes represents 10 minutes.
    • So, if the average cpu is over 25, for 2 consecutive blocs of 5 minutes, the alarm will raise.
  • Next, add 2 notifications.
    • You want an email when this alarm is entering its “alarm” state.
    • But, you also want a notification when everything is back to normal.  So, hit “+Notification” Button, and add another alarm, but choose “State is OK”.

Finally, do the same again, for “CPUCreditBalance” instead of “CPUUtilization”.
And, configure to get alarm when your Credit is below a fixed limit.
Something between 50 and 100 can be OK for a T2.Micro instance, but you can choose another limit based on the Alarm Preview graph.

How to build your solutions without Visual Studio installed

I have a small AWS EC2 Windows instance that I use for my personal usage, like hosting that blog.

When I create some small projects at home in Visual Studio 2017 Community, this is how I am able to build them on my server without installing Visual Studio on it.

First, you need to get the latest msbuild.
You can get it from Visual Studio 2017 download page.  On the bottom, click “Other Tools and Frameworks”, then choose “Build Tools for Visual Studio 2017”.
Direct download link

Start that setup file (vs_buildtools_xxx.exe), and choose “Web Development Build Tools”.

After installing, you will get a new command prompt in the start menu, called “Developer Command Prompt for VS 2017”.  Use it to start your command prompt, as it will add to path all required folders to run msbuild from anywhere.

Go to your folder with your solution sln file, and just type msbuild.  It will automatically start building the sln files.

If you use nuget packages, you will get errors about missing packages.  You may have read somewhere that you only need to type “msbuild /t:restore”, but I think that it’s only works for .NET Core solutions, it does nothing for Studio 2017 classic framework projects.

Now you need an additional file: nuget.exe, that you can find there: https://dist.nuget.org/

I use the latest version, 4.1.  The download is not a setup, it’s directly the nuget executable.  Only 1 file is needed.

I suggest to save it somewhere available in your path from DOS, maybe at the same place that msbuild was installed, [C:\Program Files (x86)\Microsoft Visual Studio\2017\BuildTools\MSBuild\15.0\Bin].

Now, get back to your sln folder, and just type “nuget restore”.  The “packages” folder will be created, and required nuget packages downloaded there.

You’re ready to try msbuild again.

Wow, it just works!
That was that easy.


How to track your server-server call in Fiddler

Telerik Fiddler is the web developer’s best friend.

It does a wonderful job of telling you why it worked, or not.  Its ability to edit and replay some requests is wonderful.  That, with Advanced REST Client, both help you accomplish your day to day job.

It tracks everything.
Almost.
Sometimes, you need to track server-to-server requests.  Example, if your app calls your back-end api, and then, your server needs to call Mandrill API to send an email to your customer.

By default, Fiddler is not tracking that request, that goes out from your server-side app. But, there’s a solution.

In fact, Fiddler track all web traffic generated by “you”, the user currently logged, and who started the fiddler app.

Now, knowing that, all you need to do, is make your IIS Pool run at your name.

By default, IIS uses “ApplicationPoolIdentity” user, it’s a kind of virtual user generated by the web engine, to run the app.  Each pool have its own username.

But, you can change it to something else.

Open IIS.  Go to the Application Pools section. Choose your app pool, then open Advanced Settings / Identity.  Click the dots, choose Custom account, enter your credentials, and you’re done!

Now, your outgoing server-side calls from your back-end can be tracked in Fiddler!